As part of our continuing effort to modernize technology and improve our cyber-security protection, we are replacing spam-filtering software, SpamTitan, with Barracuda Email Security Service. This will occur Wednesday, October 30th, 2019.
Recommended: This four minute YouTube video is the easiest way to quickly get up-to-speed on using the new spam system: https://www.youtube.com/watch?v=zw1g9pnRu-M
Below are details on how to setup and use Barracuda to manage your spam.
1.Login
The login web address is https://ess.barracudanetworks.com
- Username: CPCS email address
- Password: CPCS PC password
- Note: when you change your PC login password, you will need to use the new password to access Barracuda
- Once you login, you have access to the “Message Log” where you manage quarantined messages and set preferences (like frequency of notification) or whitelist someone
2. Spam notifications
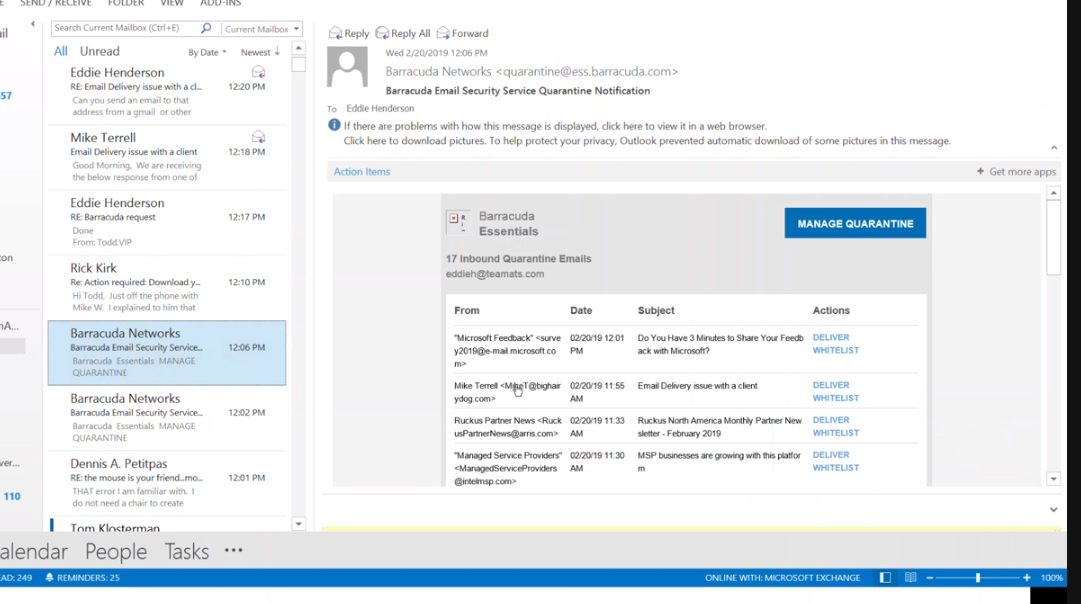
Around 3am daily, you will receive an email (you may change this frequency) listing messages in spam (see Figure 1).
From this email you may choose to “Deliver” a message or “Whitelist” the sender.
- Delivering: Puts the email in your mailbox
- Whitelisting: Delivers the email AND instructs the system not to quarantine in the future
Note: Quarantined messages are deleted automatically after 30 days.
Figure 1: Quarantined Email Notification
 3.Change notification frequency
- Go to your Message Log
- Go to Settings > Quarantine Notifications page
- Select Scheduled and click and drag to set the day and time for notification email delivery (Figure 2)
- Click a selection to clear a selection
- Click Save Changes to save your settings
- Select Never if you do not want to receive quarantine notifications
Figure 2. Set Quarantine Notification Interval.
4.Manage your quarantine
You may check your spam quarantine any time you wish (e.g., someone tells you they sent a critical email 15 minutes ago and it isn’t in your inbox) by logging in to your account
- Login to your account to use the Message Log to manage email
- The Message Log page displays all email messages quarantined as potential spam
- You can filter messages by using the drop-down menu (Figure 3)
- All – show all messages even ones that have been delivered to your inbox
- Allowed – show only messages that you allowed to go to your inbox
- UI Delivered – an administrator manually delivered the message to your inbox
- Not Allowed – show messages that are held and not delivered
- Blocked – known spam sites or domains or flagged as hosting a virus
- May only be released by the helpdesk. Blocked messages are KNOWN spam or viruses. IT may refuse to unblock unless demonstrated safe
- Deferred – the message is ready to sent, but an issue (e.g., email servers down) blocked it from being delivered
- Quarantined – held until you release them
- Blocked – known spam sites or domains or flagged as hosting a virus
- It is best to filter by “Not Allowed”, so you see ONLY the emails that are quarantined.
See Figure 3. Show / Filter Messages in the Message Log.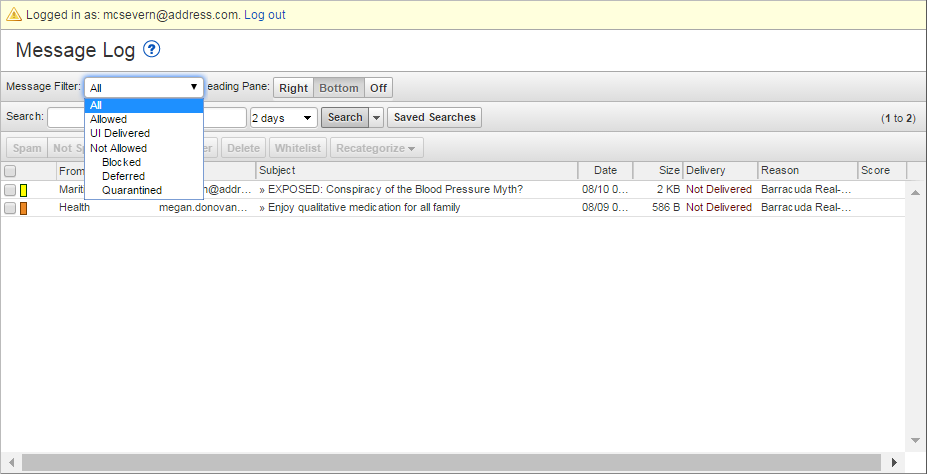
- Managing your messages:
- Select message(s) by clicking the box to its right (red circle), and then select the action you wish to take. (Figure 4). To select all messages, select the check box at the top of the Message List. Actions are:
- Spam – Selected messages are sent to Barracuda Central for analysis. Must select “Not spam” for them to be delivered
- Not Spam – mark messages as not Spam and send
- Whitelist – Senders are whitelisted. They will no longer be caught in the filter
- Note: You cannot whitelist blocked messages
- Deliver – The service attempts to deliver the selected messages to your mailbox. If a message is successfully delivered, the Delivery Status changes to Delivered
- Select message(s) by clicking the box to its right (red circle), and then select the action you wish to take. (Figure 4). To select all messages, select the check box at the top of the Message List. Actions are:
Figure 4. Managing messages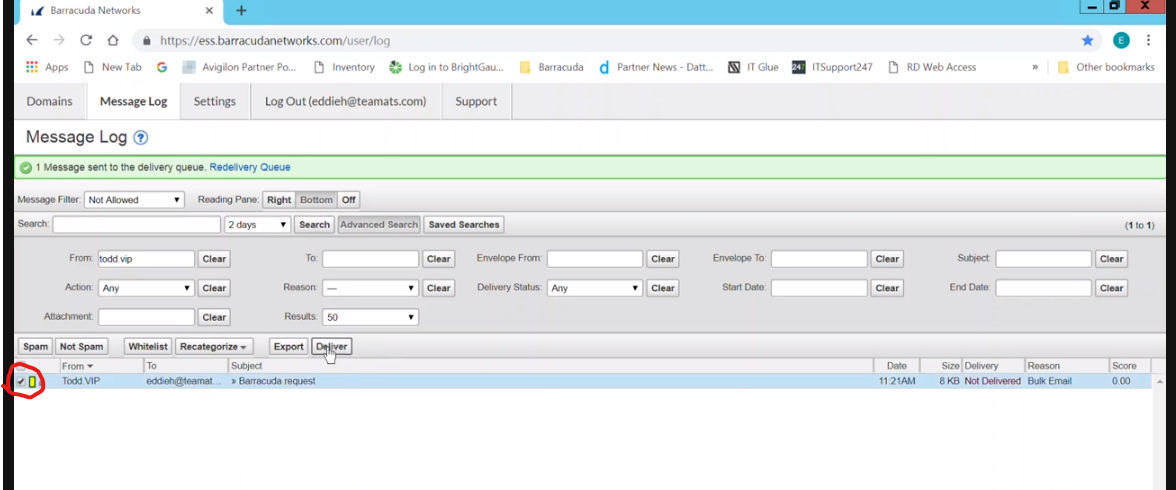
5. Whitelisting an email address or domain (or block an annoyance).
Sometimes you will have a person whose emails you don’t ever want caught in the Barracuda Spam filters. For such a person, you can whitelist their email address.
- WARNING: If you whitelist someone’s email address and they send an infected file or they were hacked, the Spam filters won’t stop it and you risk infecting the agency. So, do this only rarely.
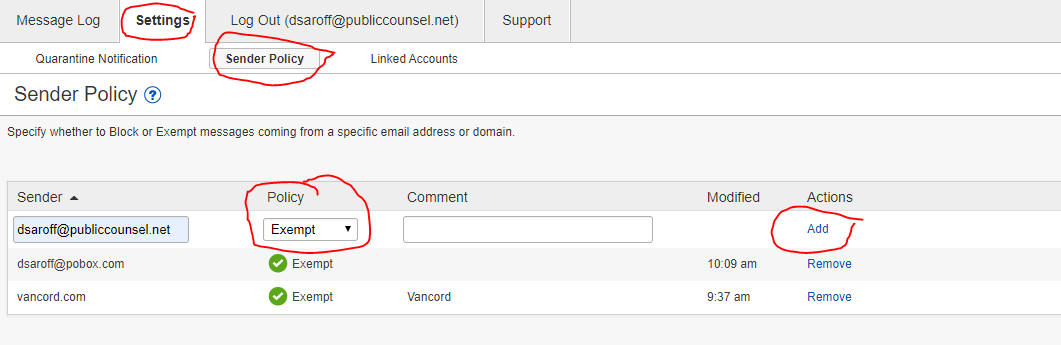
- To whitelist (See Figure 5):
- Go to Settings and click Sender Policy
- Type the email address and from the Policy drop down select Exempt
- Under Actions click Add
- To blacklist an person (permanently block them)
- Follow the same steps as above but select Block or Quarantine from the Policy drop-down
Figure 5. Whitelisting (or black listing) email addresses